When I started my brewery, it was simply a beginners kit. All the things you find in your start up pre-boxed kit at the homebrew store. I have managed to amass a small collection of various objects that I feel it necessary to identify for potential future use beyond beginning homebrewing, or just novelty rigs that are fun to historicize in this fairly historical hobby
The Growler -
In the late 1800's and early 1900's, fresh beer was carried from the local pub to one's home by means of a small galvanized pail. Rumor has it that when the beer sloshed around the pail, it created a rumbling sound as the CO2 escaped through the lid, thus the term "Growler" was coined.
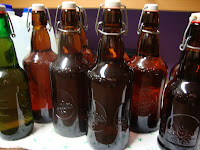
Swing Top bottles -

As mentioned and displayed in other parts of this homebrewing blog, there are several different sizes and shapes and closing devices for beer bottles. The swing top bottle is my preferred mode of storing my homebrew because it is an ideal drinking size (450ml-600ml-1litre). These bottles allow for easy open/close when bottling as well as drinking! No need for purchasing caps to fit the bottles or invest in the standard beer bottle capper. However the big dig is the price. Regular beer bottles are everywhere if you look, almost free! But the swing top bottles have an input cost which, in my opinion, is resonable. A company called EZ-Cap out of Alberta sells them bulk for over a dollar a bottle. My method has been to solicit the free listings of Winnipeg and my colleagues. As a fall back though I go to the local liquor store when i can afford it, and buy a 4 pack of Grolsch for just under $15 Canadian - or Fischer (600ml for about $5 per bottle).

Bottle Tree -
This cool, yet easily reproducable, device is a miracle for drying bottles after cleaning/sanitizing. Its a fairly exclusive made in Italy device, yet its just molded plastic with 45 pegs coming out in a radial pattern on 5 different tiers along a center column. Fits both regular beer bottles and swing top sizes...growlers are out of luck. You could make a similar one with as many dowl rods and a 2x2 piece of wood and a drill if you fancied it.

Grain Mill -
This is actually a beef mill, but I figured it could be used for grain too and what a great reclamation of a once butchery device now put to use for the grinding of locally made handcrafted beer to be consumed largely by a vegetarian! Precious symbolism! Now, this device is not that good...if i could be so blunt. It has two different grind plates, one with holes (ground beef?) the other with triangluar fan style openings (fanned beef?). The purpose of milling is not to pulverize the grain, but to just pop the husk as you want the endosperms to stay intact when preparing the mash. I recommend milling at the homebrewstore unless you want to
 invest in a home mill that utilizes rollering pins rather than grinding plates.
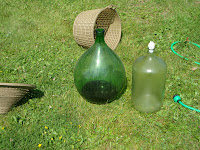
Demijon -
Revel in the size of that honkin thing! Rina's nonu being an avid wine maker, had a few of these. This one somehow ended up at the farm...within my reach! Its about 56Litres! That will hold about 2 1/4 five gallon batches comfortably. I havent gotten the chance to utilize it yet since I dont have a homebrew under my belt that I feel I want 84 Grolsch bottles of yet! When the time comes, I will be enlisting help, as I figure it will require two batches on the stove at once and needing some consistency too! Probably needs about 3 yeast starters...

Hops -
It doesnt have to be all equipment! I started a hops plant back in late may. I got it from a nursery which is never a safe bet because the plant needs to be the female variety to yield, and secondly it takes three seasons before said plant will yield the precious hop flower we as homebrewers are after. Not to mention the fact that these hops could just plain ol' suck! Ive read that wild hops are hit and miss, and these are most likely plantation grown root transplants from a mega nursery that doesnt specialize in strains. Dont get me wrong, if this guy (hoping a girl though) gives me flowers im going to use them!
Mash-tun -

I outlined what the mash-tun is and does in this previous post, but I wanted to dispell any misconceptions of the device from the inside, in case it seemed scary and complicated (as i perceived it before building one). The image here is of the stainless braid that fits snuggly around the 3/4" inside-diameter copper piping, connected with a 3/4" outside-diameter hose clamp. It was quite a pill to squeeze down in the water jug and tighten the clamp, but it had to be done. Now because this device is only held in with a fairly old drilled rubber stopper, its best to hold the stopper in place when pouring the strike water because if you have a leak, its gonna be a sticky near-boiling mess that no-one is going to want to drink if you decide to power through.
These are a few of the devices, aside from the basic rigs like glass carboys and airlocks, that I have accumulated over the last 6 months that I have been brewing!


will we get a chance to taste test this ber over canadian thanksgiving?
ReplyDelete